
One thing you should know about me is that if challenged to do something by a friend or family member, there’s a fair chance I’m going to give it a try. That’s pretty much how this blog came to be and it’s definitely how these cookies came to be.
Recently my mom posted a you-tube video gone viral of a woman decorating the most amazing lace-like cookies to my Facebook page. You may have seen it. Totally mesmerizing. I’m not sure if it was meant to be a challenge or an inspiration, but I took it as a little bit of both. I set out for the perfect flat cookie recipe to serve as a canvas and went to work.
This chocolate cookie recipe (detailed below) makes a dough that is excellent for cutting, as the cookies don’t really spread or rise. The finished cookies are firm and flat, perfect for dunking in hot coffee or cold milk. I think you’ll like it. For the Icing, I used this recipe, prepared in two consistencies. Flood consistency for the large white area and a more firm mixture for the lace piping.


This cookie batter is unique in a couple of ways. First, the butter in used cool, rather than brought to room temperature. This eliminates the step of chilling your cookie dough prior to cutting if you work fairly quickly. Second, the dough is rolled between two sheet of parchment paper, rather than with flour. This keeps extra flour off of your cookies and prevents the chewy texture that sometimes results from cookies rolled the more typical way.


You also want to be sure not to over mix your cookie dough. I’m pretty sure that’s what caused the air bubbles that you see in some of the cookies above. Total bummer.
After fully cooled, I set to work figuring out this whole lace piping ordeal.


It didn’t take long to figure out the order of operations that worked best for me. I’m going to make your life just a smidge easier, too, and share it with you here.
Lace Royal Icing Piping in 9 (sort of) Simple Steps:
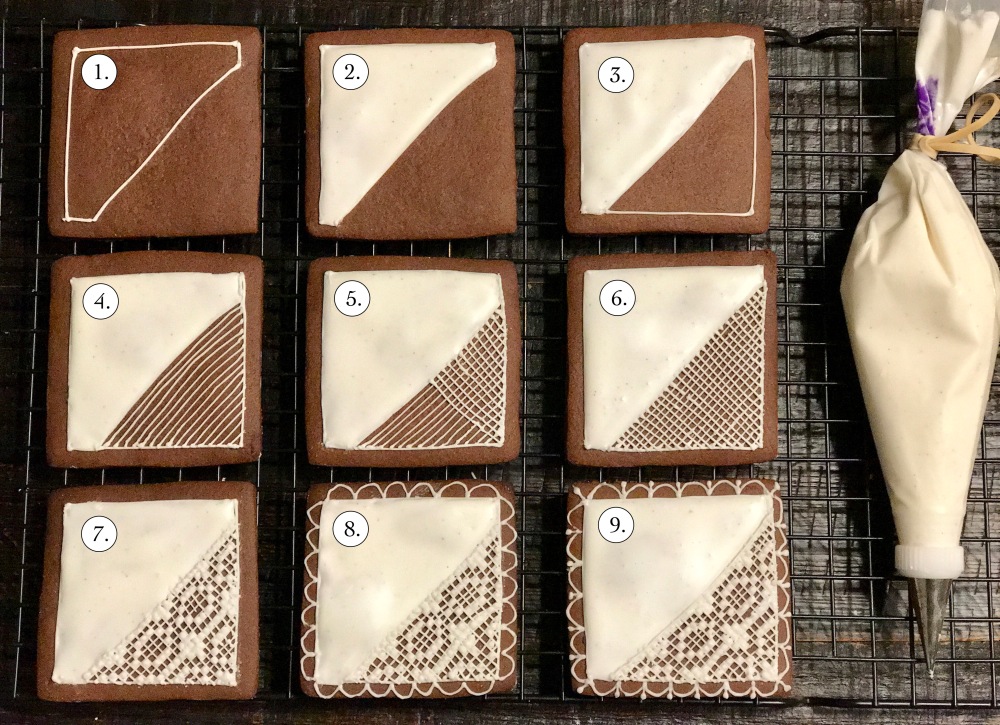
- Outline the area of your cookie that you will NOT be using for your lace textured piping.
- Flood the outlined area with flood-consistency royal icing. For this project I made my icing fairly runny, and applied the coating with a spoon rather than piping bag. This made things super easy!
- Outline the remaining area that you plan to fill with lace. I’d suggest leaving room around the perimeter of the cookie for a border design.
- Pipe fine lines (using a Wilton #1 tip or smaller) as close together as possible. Remember, the more lines you fit in your space, the more rows of lace you’ll end up with.
- Pipe perpendicular lines with the same tip, starting at the center of your space. This helps your lines stay nice and square.
- Pipe the remaining perpendicular lines, completing the grid on which your lace will appear.
- Pipe tiny dots in whatever lace pattern you like, using your lines as a grid. I tried several patterns on parchment paper prior to tackling these cookies to make sure I had a design that I loved. If you’re not sure where to start, consider grabbing a sheet of graph paper and experimenting with patterns of alternating empty and filled-in squares.
- Add a scalloped border around the entire design.
- Finish by adding small dot work or embellishments to give the cookie a more complete look.
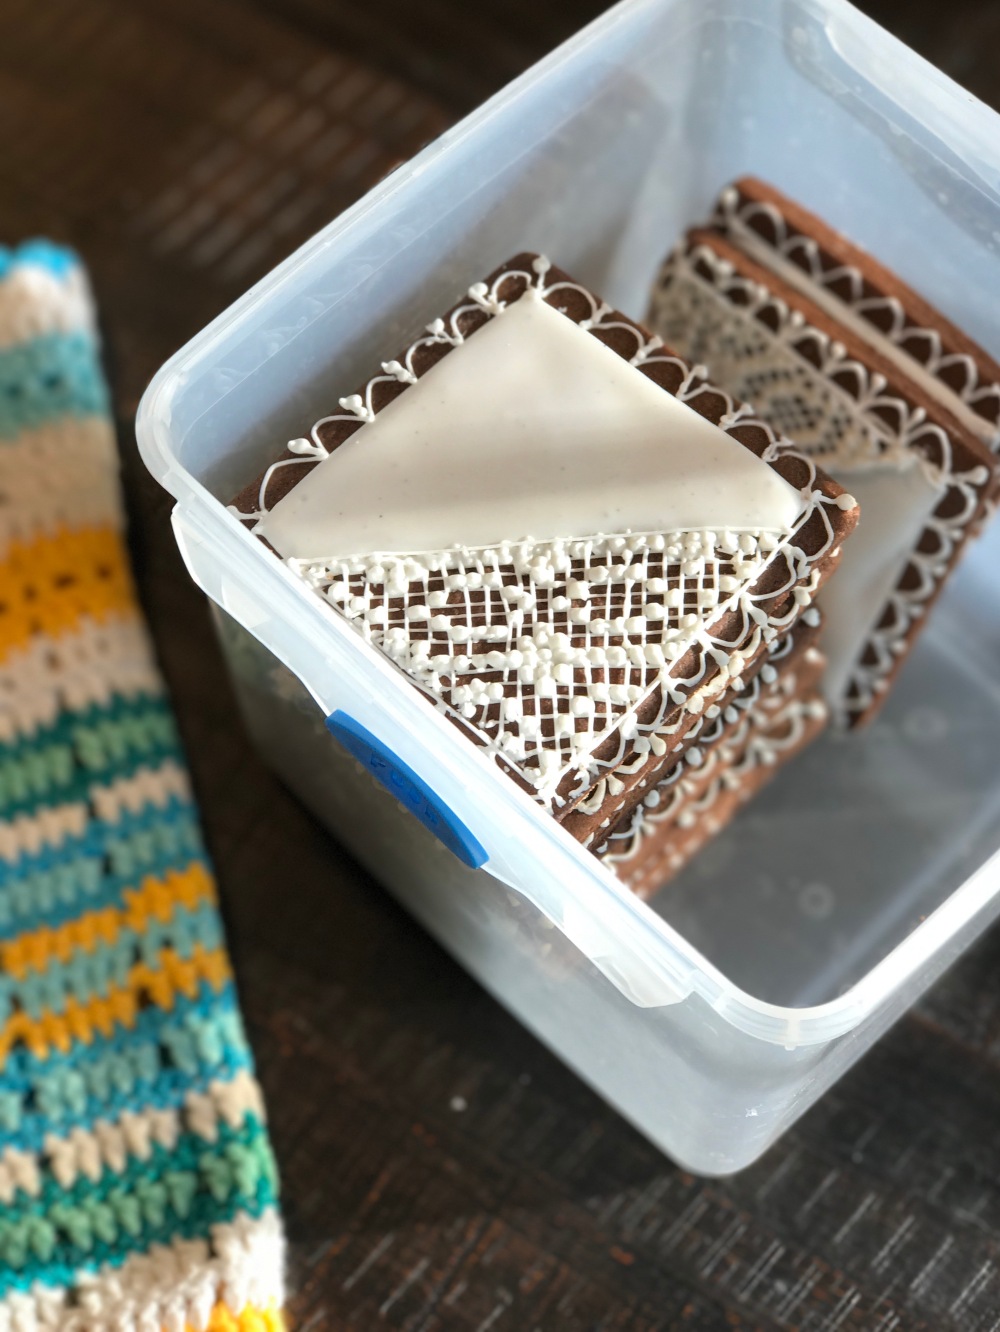
You’ll want to let your cookies sit flat for a few hours (or overnight if you’ve got the time) prior to stacking. Once dry, though, you can stack away without concern… these babies will not smudge or smear. Store in an air tight container until you are ready to plate or package your cookies.
This technique would work beautifully on basic sugar cookies, as well, but I just love the look of the bright white lace on a rich chocolate base. Here’s the recipe in case you agree, adapted a bit from these sweet little gems from over at Baking a Moment:
Chocolate Sugar Cookies
Ingredients:
- 1 stick (1/2 cup) butter, cold
- 1 tablespoon canola oil
- 1 teaspoon vanilla or almond extract
- 2/3 cup sugar
- 1 pinch of salt
- 1 egg
- 1/4 cup cornstarch
- 1/2 cup unsweetened cocoa powder
- 1 3/4 cups flour
Method:
- Cream the first five ingredients in a stand mixer with paddle attachment until just smooth.
- Add egg and mix on low until fully incorporated. Add cornstarch and cocoa while continuing to slowly mix.
- Add flour slowly to your dough until it pulls away from the sides of the mixing bowl and forms a nice ball. This will probably take between 1 1/4 cups to 1 3/4 cups of flour total. Once a ball has formed, go ahead and stop mixing
- Preheat your oven to 375 degrees.
- Roll dough between two sheets of parchment paper to about 1/4-1/2 an inch think. These cookies will not spread or rise very much so, if you go thinner with your dough be sure to check on the cookies early on to avoid too much browning.
- Cut desired shapes and bake on a Silpat or parchment lined cookie sheet for about 10 minutes.
- Allow cookies to cool completely prior to decorating.
OK, team. Time to get baking. And come on back here and let me know how it goes, would ya… way way down there in the comments below!
For more from my kitchen, click here.


Beautiful cookies and very nice site. You did a wonderful job showing and explaining how to pipe the lace. I doubt I have the patience to do this. 😄
LikeLiked by 1 person
Thank you.. and yes, I think patience is really the key with these cookies. None of the steps on their own require any great skill… but they do require a bit of focus and time 🙂
LikeLike
Wow these cookies are almost too beautiful to eat! Love your site! 😀
LikeLike
Oh thank you! They are great in that they are actually much simpler to make than they look. They do take some time though!
LikeLiked by 1 person
Oooh, so pretty and impressive! I’ve saved your post to my Pinterest and am putting it on my baking To-Do list.
LikeLiked by 1 person
Oh awesome! Definitely come back and let me know how it goes… I found these to be easier than they look, though somewhat time consuming :)!
LikeLiked by 1 person